Creative process- Hope Grows

 Here is my dirty little secret. There is a point in almost every creative project that I undertake where I hate my work, passionately. This is where I reached that point with this art journal page. I hate how the daffodils dulled, and the background muddied, and the elements feel disconnected. At this point, I want to rip the page out and throw it away.
 I decide to see it through, because I was loving the idea of the daffodils, and didn't think I could remove them without destroying them. I decide to try and clean up the piece with some stronger color, so I add spray ink. At this point I like it better, and love the look the pink gives it.


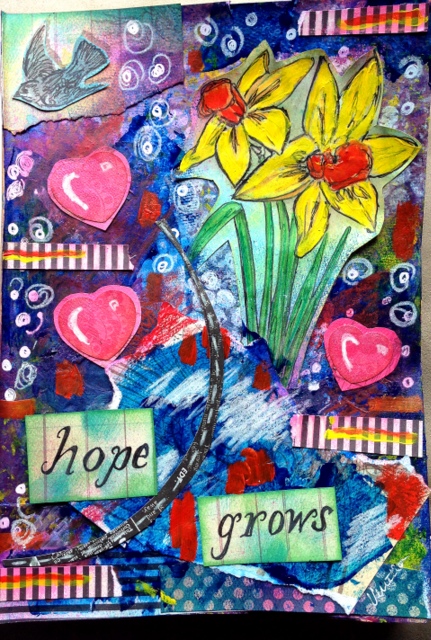
Then the ink dries. and it gets really pale, runs off the desso, and looks pale. I darken the lines on the daffodills, and on the bird, which is getting washed out.


I add some dark blue to try and add depth to the backround. The paper element soaks it up and looks almost black, while the top of the piece is still grey and muddy. Gross.


 At this point I am really upset. I decide that I can't un muddy the piece, so I have to add unpainted/uninked paper to try and build up the color. Right here, this is where I decide I have lost my mind. Yes, it looks like I shoved a piece of paper on a mess, but notice how the backround "pops" a little more once there is this pale paper?
At this point, I work the background a little harder, and repaint the daffodils to brighen the color. I use a blue to dover the lighter paper and add the striped paper to add interest. I add the hearts to balance the page, and incorporate the saying. I added the black scrap to give a fluid feeing, and start adding white doodling to lighten the feel of the page. This is the point where it really starts looking trainwrecky. 

I added the light ink on the black, and build up the white sections more. At this point, the piece is at a point where I feel it is "complete". 

Hope you liked this peek into my process. The hardest part is not giving up on the work at the point it is feeling frustrating.

~Venetia

Product Review: Ohto graphic liner needle point drawing set

The Ohto graphic liner pen set is designed to give the feel and look of using art markers (think micron) in a ball point tip, which is less prone to breaking.


Art process: Return with Honor Canvas

I get asked about my creative process, so I took some progress photos of this comissioned project.

The requestor is a great friend and she had specific instructions, teals, greys and browns, "Return with Honor" statement, and 11x14 canvas size.

I thought about that for a bit. I decided to add a compass and crown to the design, because she is LDS, and those items would fit well with her beliefs. I sketched out my idea to play with placement.

After the sketch was finished and approved, I decided on what to use for the background. I started the canvas with an background of acrylic paints, a mix of burnt umber and iridesent turqoise. I decided to incorporate a map in the background, and some papers to tie in the colors she requested. I arranged and distrisssed the papers and glued them down. I also incorporated a compass and compass rose into the background. I drew that on manila paper and then inked it to create depth and age on the piece.

While those elements dried, I sketched the crown onto paper, and built up the design with ink, pencil and markers. I fussy cut the final design. I also drew the heart and used colored pencils to build up the dimension of the heart. I played with laying out the elements, and decided I needed to make the statment.

I hand drew the words on cardstock, and distressed the pieces. upon placing them on the background, it was clear more depth was needed. I used gesso, acrylic paint and bubble wrap to add a layer of texture to the background. I smeared out the paint from the Utah on the map to highlight the state, and arranged the elements.

Everything started to meld, but the heart looked out of place, so I glued it and fussy cut a lighter background that I distressed. Everything was arranged, and glued down to create the finished piece.

~Venetia


Art Journal- Be yourself


Sometimes, I find inspirational quotes pithy. "Be yourself, everyone else is taken," for example. Some days you don't want to be yourself, because life is busy, or difficult, or sad. I explored this with this journal page.

I wanted something fun and bright, but I wanted the sentiment to reflect that sometimes, being yourself isn't the easiest choice. I like the color on this one.
~Venetia

Heart Tutorial


Urban Grunge Tattoo Heart Tutorial


I wanted to create a 3-D version of the classic winged tattoo. You will learn the ins and outs of creating this project, and a little of my creative thought process. I’m a klutz, and kind of messy, so have fun!

Supplies:

Pre-made paper-mache heart
Decoupage Glue
Black Faber Castell Pitt Artist Pens: Small, Medium, and Brush
Faber Castell Pitt Monochrome Graphite Pencil
Painter’s Tape
Sepia Faber Castell Pitt Artist Pens: Brush
Faber Castell Art Grip Colored Pencils: Blue and Red
Faber Castell Metallic Gelato: Gold
White Ribbon
Flower Embellishment
Glue Gun
Plastic Garbage Bag
Sponge Brush
Plastic Clothes Hanger
Shrink Plastic

Instructions:


1. Cover the work surface with a flat garbage bag.If you are like me, decoupage can get messy.If you are not like me, then you may disregard the need for the bag. Gather your pre-made heart, and a 12x12 sheet of red (or your favorite heart color paper). At this point, you have to make a choice, some people are precise, and the torn edges on the finished project would drive them nuts. If that is you, cut the paper with scissors.If you like the torn look, then sit down and tear up some paper. Take all your aggression out on it. You’ll feel better.


2.Get your decoupage material and sponge brush. I use Collage Pauge, mostly because my craft store did a demo of it one day and let my kid glue marbles to their table for a half hour or so while she was supposed to be making magnets. She wasn’t intentionally gluing them, but when you are six, more glue is better, and everything gets glued together. When we were done, she wanted to make more, and I had to purchase the products they used, because when you are six, you do what the teacher says. I guess the lady on the front label is famous, I don’t know, but she does make a good decoupage medium.
3. Use the garbage bag as a palate, and just squirt the decoupage medium on the plastic. If this would drive you crazy, then go get a plate, or something in which to put the medium. Brush the medium on the paper mache heart and all over the paper. For me, using the brush lasted about ten seconds, and I ended up dipping the paper in the pool of medium, placing it on the heart, and smoothing it out with my fingers. Either way works. Place paper all the way around the heart. If the paper doesn’t want to smooth, tear it into smaller pieces. When you are done, hang the heart to dry. I didn’t really think of that part beforehand, so I was wandering around with a sticky heart and hands trying to figure this mess out. The beautiful thing is that once I figured out to hang it from a kid’s plastic hanger, the garbage bag folded up nicely, and my mess was gone.


4. For the wings, I used shrink plastic; remember shrinky dinks? This is the same thing, but not preprinted, so it can be whatever you want it to be. I wanted it to be wings, so I sketched out a wing with a Graphite Pencil. If you prefer, you can find a wing image and trace it. Whatever works best for you. I secured the shrink plastic with painter’s tape because when I do not, it slides all around, and I mess up my tracing. I used Black Artist Pens to trace the sketch, and build up the lines for more dimension. Be careful tracing, as the artist pens and the shrink plastic work like a whiteboard, and if you drag your hand across tracing you have already done, it will rub off. I learned this the hard way, so don’t be like me on this one, or you’ll end up with missing lines and a black smeared hand. This is useful, however if you mess up, just rub it off and try again. Flip the image on the second sheet so your wings face out opposite and complete the second wing.


5. Once you have the tracing done, you can add some color with Colored Pencils. Don’t color against the black lines, or you will rub off the black. Then, cut your wings out, and place them on a baking sheet. At this point, I noticed I forgot to flip the wing so they would each point outward correctly, so I quickly retraced the image through the plastic. I like to live under the rule that if I mess up and it turns out ok, then it was on purpose. So, I on purpose decorated both sides of the wings. After your oven has preheated, follow the manufacturer’s instructions for shrinking the plastic. Don’t get too creative here, no one wants melted plastic in their oven. It smells bad and is a pain to clean.


6. Take your ribbon and distress it by running the SepiaPen along the edge, and by rubbing the Silver Metallic Gelato on the top of the ribbon. I used a plain white grosgrain ribbon. Once I was happy with my distressing, I laid out another garbage bag and set up some more collage pauge and ran the ribbon through the medium, and then laid the ribbon across my heart artfully. Then, I placed the heart on a new garbage bag, and set it so the ribbon had a bit of a wave to it and let it dry. The medium gives it a bit of stiffness, which works well with the end project.

Once the heart is dry, you can use the Black Art Pens to add wording to your ribbon. Glue on the wings and flower embellishments, I use a low temp glue gun because I am clumsy and burn myself on high temp, but you can use your preferred adhesive. You too now have an Urban Grunge Tattoo Heart to call your own!

Hope you liked my tutorial!

~Venetia


Product Review- Pigma Sensi Manga Drawing Set

I picked up the Pigma Sensi Manga Drawing Set from Jetpens.com, and I am surprised how often I pick up this set. It includes eight pieces:


.07 Mechanical Pencil
.3 Fine tip pen
.4 BulletTip Pen
.6 Fiber tip marker
1.0 Fiber tip Marker
1.0 Chisel tip
2.0 Chisel Tip
3.0 Chisel tip


Somehow I managed to destroy the .3 Fine Tip Marker. My favorites in the pack are the .6 and 1.0 Fiber tip markers. I use them for lining artwork, and enhancing dark lines.

The mechanical pencil is a standard mechanical pencil, with a drafting feel. The pens have a dark black line, and are sturdy except the .3, which would be delicate in any brand. I've used them with great success in mixed media projects, and they mark well over multiple surfaces. The ink is archival safe, and surprisingly there is no bleed through despite the dark lines.

The full set is under $20 at jetpens.com.
Overall Rating 4/5


Journaling Prompt- Finding the silver lining

As I have mentioned, there has been a lot of fun in our house lately, and not the good kind.  I snapped pics of things this weekend, and I haven't printed them yet, but they tell a sweet story, and I thought I'd share. My husband has spent the last several days rebuilding the engine in his car.  This picture shows the dash torn down to the firewall so he can put in the new heating core. Here he is working on the wiring under the dash.  Isn't he lucky to have a wonderful wife who will capture him working? It's totally the same thing if I am documenting progress and he is making progress, yes?

Honestly, I feel so grateful that he knows how to repair this, since he has been a tech forever, which is since they had those Flintsontes cars. A joke in our house is that he sits on his laurels because his Mom made a passing comment that suggested that all he does is sit about the house. For the past five days, he has either worked on the car all day, or gone to work and then worked into the night. I really am grateful that he has put so much into keeping things running well for us. He is definitely not sitting on his laurels, although I am pretty sure he would give anything to be able to lately!

It hasn't been all bad, the neighborhood peacock stopped by at 6:30 am on Saturday to say hi, so my oldest got to see him, which she liked. She did try to tell her little sister it was a dog, which didn't fly with Budgie.  Smart girl that one. 


Its been nice out, so the girls have been playing outside constantly. The oldest is riding her bike, and the youngest is either playing on the rocks in the driveway, or rolling down the hill.

How are things going for you? Rough? Good? What's your silver lining?
~Venetia


Art Journal- Hope Grows


The past couple of weeks have been just nuts in our house. Major things keep breaking. My husband's car is in a gazillion pieces in the driveway as he rebuilds the engine. (Thank goodness he is a tech).

I have learned to not say "What next". I have also learned to try and see the little blessings in it all. It's been a string of awful luck, or circumstance, but we have had some good luck too.  Hubby's a tech, so the car will be fixed and brand new (mechanically). We had some help with the furnace getting fixed. No one was hurt in the accident that took out my car mirror.

Yes, I'm tired. Yes, I kind of want to cry. Yes, I need it to all stop. Yes, I am okay. Because my hope grows.

~Venetia

Scrapbook Layout- Budgie

My usual starting point for a layout is the pictures. Sometimes, it is the paper. This time, I chose to start with a pile left over from the other projects I had been working on recently.  I've been seeing a lot of layouts using stacked banners, and I thought that I might try that, but didn't want to work from a sketch, so I just played. 

I read an article this week that said over planning kills creativity. It specifically mentioned how creating long lists of items to blog or create kills spontaneity that can bring amazing work by allowing inspiration to lead you. I decided to just let the ideas floating around take shape and see what happened.
My Process:
I started by cutting the banner pieces, and arranging on the page.  I added the black to anchor the circle, and the bottom banner to balance the circle. Then, I decided on my photo, and because it was black and white, I decided to matte it with a pink paper.  I decided the title needed to be black to balance the circle. When it came time to journal, I decided to use the black circle, and mimic the print. I used gesso to create a writing surface, and a black pen to journal. Finally, I faux stitched my edges, and misted the layout.


Once it was finished, I was a surprised at how much I liked it.  I was also surprised at how some of the art journaling I've done recently has infused into my layout.  So try approaching your scrapbooking from a different beginning point.  It doesn't matter how you change your approach, just try starting somewhere new.

Mini me and a camera.

I find the world through the eyes of a three-year old fascinating. Budgie stole my iPhone and figured out the camera. This resulted in an epic string of photos that gives a glimpse into her little world.  When my oldest did this, her subject was herself.  My youngest seems to have a broader view of her world. First, her frog. It is important, therefore it is thrown on the floor.  Her first photo.


Top 5 Wish List- Feel free to send!

Here is my current wish list of art/craft supply items.  They range from the reasonable $2 to the less reasonable $1,000 price range. I ask for them in jest in the title of the blog post because my husband always tells me to put it out to the universe and it will resolve itself. He's kind of new-age-crystal that way, and I can't argue that if you don't try, you can't get shot down in a firey ball of NO!

In any case, these are a few things that have been on my radar lately. Hopefully, I can enable you as well!

1. Caran d'Ache Neocolor II Artists' Crayons- These just look like so much fun. Crayons that you can turn into water colors? Rich, vibrant color? Yes please.

2. Stabilo Colored Marking Pencils: In black and white. These look amazing for working with mixed media. It is no secret I am addicted to writing utensils, and this is the newest crush I have. It is marked ALL on the side... that means it will be all I need, correct? "I just need this pencil, and this chair, and this paddleball game and that's all I need." (If you haven't watched The Jerk recently, or ever, do yourself a favor and watch it. Seriously, one of the most perfect pieces of comedy ever.)

3. Dylusions Ink Sprays: I have the black and the postbox red.  I love them. There is a white I am so excited over, but cannot seem to find. I need that one and well, pretty much all the colors.  I want to spray everything.  My kitchen table, I mean studio, is becoming very colorful. Come here my daughters, Mommy wants to spray you.


4. Golden Mediums: Doesn't this sample set look amazing? I could have so much fun with that. Texture, gloss, matte.. and look at these Mica additives. Sparkles? Yes. I could rock this stuff.

5. Mac Book Air: PC is good too, but these are just gorgeous. Maybe one day...


What are you wishing for?
~Venetia


Art Journal- Stress

Last week sucked. Sunday, there was a gas leak. Monday, the Furnace shot a fireball across the basement, and we found out it is toast. Thursday, my car got backed in to. Friday, my tire had a tear.  Seriously, last week. I'm over you. 

Naturally, any sort of hectic mess brings stress, and last week really took a toll.  I took it out on my art journal and ended up with this messy, angry frustrated page. Which pretty much summed up the week.

See my poor car? The girls are loving reminding me about how the truck bonked my car and then it broke. The daily reminder is much appreciated girls, I hadn't noticed my driver's mirror missing.

Here's to a better week!
~Venetia

Fun- Scrapbook Sketch


My oldest is a rough and tumble girl, and I loved how this photo caught her intensity.  She adores being outside. She climbs, runs, and gets dirty. She’s always been this way.  She has so much energy, and she brings so much joy to anything she does. She definitely brings the sunshine into the many, many gray days we have in the Pacific Northwest.

With this layout, I wanted to capture the feel of my oldest.  I wanted it to be happy, and busy, and bright. Authentique is one of my favorite paper lines, and I love the teals and yellows in the papers.

I used a few circle embellishments to capture the feel of the bubbles, and if I can put a flower and button on something, it’s happening.

I have shared the sketch with you, Happy Monday!

~Venetia

Journaling- 25 great prompts

We all get "it".  It goes by many names:
-Stuck
-Lost my mojo
-Uninspired
-Frustrated
- (insert yours here)

Journaling prompts are a good way to get away from "it", whether scrapbooking, painting, journaling, sketching, or writing. Prompts take away everything so you can focus on something.

Art Journaling- Lost Peacock

Sometimes it is hard to find inspiration, and sometimes, it is sitting in your driveway on a Friday afternoon. I live in the middle of Tacoma, WA. I love city living because of the colorful atmosphere of the neighborhoods. There are no HOAs or covenants, so as long as homeowners aren't cooking meth, or housing enough junk to create a health hazard, people can pretty much do what they want. This creates an eclectic mix of houses. Yes, I have to put up with neighbors having grass a little long, and dandelions in the yard. Since my yard isn't particularly gorgeous, its okay. When the girls color the sidewalk, it can stay there until the rain washes it away. There are odd colored houses, and boats and RVs parked in yards, and I just don't care. The people around me care about their homes, and they may not maintain them in the same manner I would, but we all get to live and let live, and I love that. There is so much personality in each home, and that makes me happy.


Pinspired Challenge #5


I like doing challenges as a way to find inspiration.  Pinspired Challenge #5  is the first of their challenges I have tried, which is awful of me because my sweet friend Jen is on their Design Team and I adore her talent, especially with stamps. She is seriously one of my stamping heroes. This particular challenge was tough for me because I have a love/hate relationship with rainbows. I felt like this was a great way to challenge myself to use their selected pin to work with something that I don't normally do. Of course, a heart had to sneak its way onto the card, and I am going to hand-letter if I get a chance. I can't change everything that makes what I do mine, right?
I used a 7 gypsies paper, that was black and white patterned and used my Prismacolor Colored pencils to color in the swirls.  Then, I punched the heart, and added a doodle to mimic the swirls. I was happy with how it turned out, and it is always fun to get to play along with friends. There's still time for you to play too!
 Have a sweet day!
~Venetia
 

It's not Cheating- or finding cheap supplies

In art and crafts, there is always a new product/gadget to spend money on.  I have a few items that aren't supposed to be craft supplies that I use all the time.

1. Nail files: I pick up the rough grit black nail files from Sally Beauty Supply.  They're under a buck, and washable, so if they gum up, I rinse them and they are as good as new. I use these to smooth edges, and distress paper.

2. Manicure set: Occasionally, Big Lots carries this little manicure kit.  I picked up mine for $6. It is a great distressing tool.

3. Bubble Wrap: If you need texture when painting, bubble wrap, foil, and cling wrap are all great options for adding some dimension. Just paint the wrap and use it like a stamp, crumple it first if it is the foil or cling wrap

4. Paper plates: These and sandwich baggies work great as palattes when I am painting just a small area, or decoupaging something.

5. Baby wipes: I use these to clean, to smudge, to lift color, and I seem to grab them every time I craft. 

What have you found that is thrifty?
~Venetia


Scrapbook Sketch- Sisters and Friends


I love my two girls. They are so silly together. From the very beginning, they have been the best of friends. Cakes always would sing and talk to Budgie, and as they grew they played more and more. Before Budgie could walk, she always managed to be with her sister, and we couldn't figure out how. Finally, one day I caught Cakes dragging Budgie across the hardwood floor by her foot while she sat. I was both appalled and proud of her. Luckily, Budgie was laughing the whole way, so it clearly was a mutual arrangement between the two.

Now, they are constant companions, and Budgie follows Cakes around doing whatever she is told. Occasionally, she puts her foot down, and gets her way. Together, they make my home such a joyous place.

This layout celebrates them together. I love them each dearly alone, but something about the two of them together as they banter and play is just amazing. I snapped these photos after Cake's holiday concert at school, at Mc Donalds, where we always stop for ice cream after evening school events.

I wanted the layout to feel fun and happy like my girls.

~Venetia